Listening For Events
Open the project folder
In our starter files, open the index.html page from this lessons folder:
04.Events-And-The-DOM > 09.Listening-for-events
Organise our folder
Inside of our starter file the script section is getting crowded. Let’s first organise things into some new files:
- Create a new file: elements.js.
- Cut the contents between our current script tags and paste into this file.
- Create a new file: events.js.
- Link both these new files in our index.html:
    ...
    <script src="elements.js"></script>
    <script src="events.js"></script>
  </body>
</html>
Your file structure should look like this:

Check everything works before moving on.
Attaching events to an element
To listen out for an event we first need a way to attach it to an element, and there are different ways of doing this.
There is a long list of event handlers which we can listen for, common ones are click, change, input, load, mouseenter, and mouseleave to name a few. We add the on prefix so to listen out for a click, we need onclick.
Over to the project let’s see how we can use them. As an example, we may want to change an image when clicked on.
Adding events as an attribute
An older way which you may see is to add an event handler directly onto our HTML element as an attribute. Try this with the image just under the <header> section:
…
</header>
<img src="burger.jpg" id="headerImage" onclick="alert('clicked')" />
Also add the above id attribute which we will use soon. Try clicking on the image and an alert will pop up in the browser. We can add some simple JavaScript directly here, or we can call a separate function.
Over to our events.js file we can set it up in here:
// events.js
function changeImage() {
  alert('heeey');
}
And back to the HTML to call this function:
<!-- index.html -->
<img src="burger.jpg" id="headerImage" onclick="changeImage()" />
This way of adding an inline event handler works fine but it is often avoided since it mixes our HTML and JavaScript code. This example now means the function can also be re-used.
Adding events via JavaScript
To move this out of the HTML, we can select the element as we have done previously, and then attach the event listener:
// events.js
const headerImage = document.querySelector('#headerImage');
function changeImage() {
    alert('heeey');
}
headerImage.onclick = changeImage;
Remove the inline event handler from HTML element (onclick="changeImage()") and test this in the browser. This should again alert when the image is clicked.
Rather than just alerting, we want to be able to do something to the image element. We can use any of the techniques learned so far such as adding classes, or CSS:
// events.js
function changeImage() {
    headerImage.style.width = '50%';
}
Or even change the image completely using a different image from the starter file:
function changeImage() {
  headerImage.setAttribute('src', 'burger2.jpg');
}
And this also covers any of the other event handlers too, such as passing the mouse over an element:
headerImage.onmouseover = changeImage;
Listening for multiple events
This means all our JavaScript is now contained outside of the HTML. But one of the disadvantages of this approach is if we wanted to trigger multiple functions. Create a second function and event listener to see this:
...
function changeImage() {
  headerImage.setAttribute('src', 'burger2.jpg');
}
function hi() {
  alert('hey');
}
headerImage.onmouseover = changeImage;
headerImage.onmouseover = hi;
With this setup using two onmouseover events, only the last “alert” will run. When we set up multiple functions which respond to the same event, they override the previous meaning only the last one will run.
Another approach is to use a method called addEventListener. Leave the existing two functions, but replace the two event listeners to use this:
function changeImage() {
  headerImage.setAttribute('src', 'burger2.jpg');
}
function hi() {
  alert('hey');
}
headerImage.addEventListener('click', changeImage);
This should also work. Notice how with this method we do not use the on prefix. We simply use click rather than onclick, this is also the case for other events too.
And this also allows multiple functions to be called from the same event:
headerImage.addEventListener('click', changeImage)
headerImage.addEventListener('click', hi)
Both functions will now run when the image is clicked.
You can now remove the
hi()function and event listener.
The addEventListener method also has some other benefits too, we can remove event listener code when no longer needed, and it also has a setting which means we can adjust when the event if fired, but both will be covered in more detail later this section.
If you prefer, and do not need to re-use the function we are calling, it can also be added directly into the method:
headerImage.addEventListener('click', function changeImage() {
  headerImage.setAttribute('src', 'burger2.jpg');
})
This works the same but this is just down to personal preference, and the function can be named like this, or anonymous.
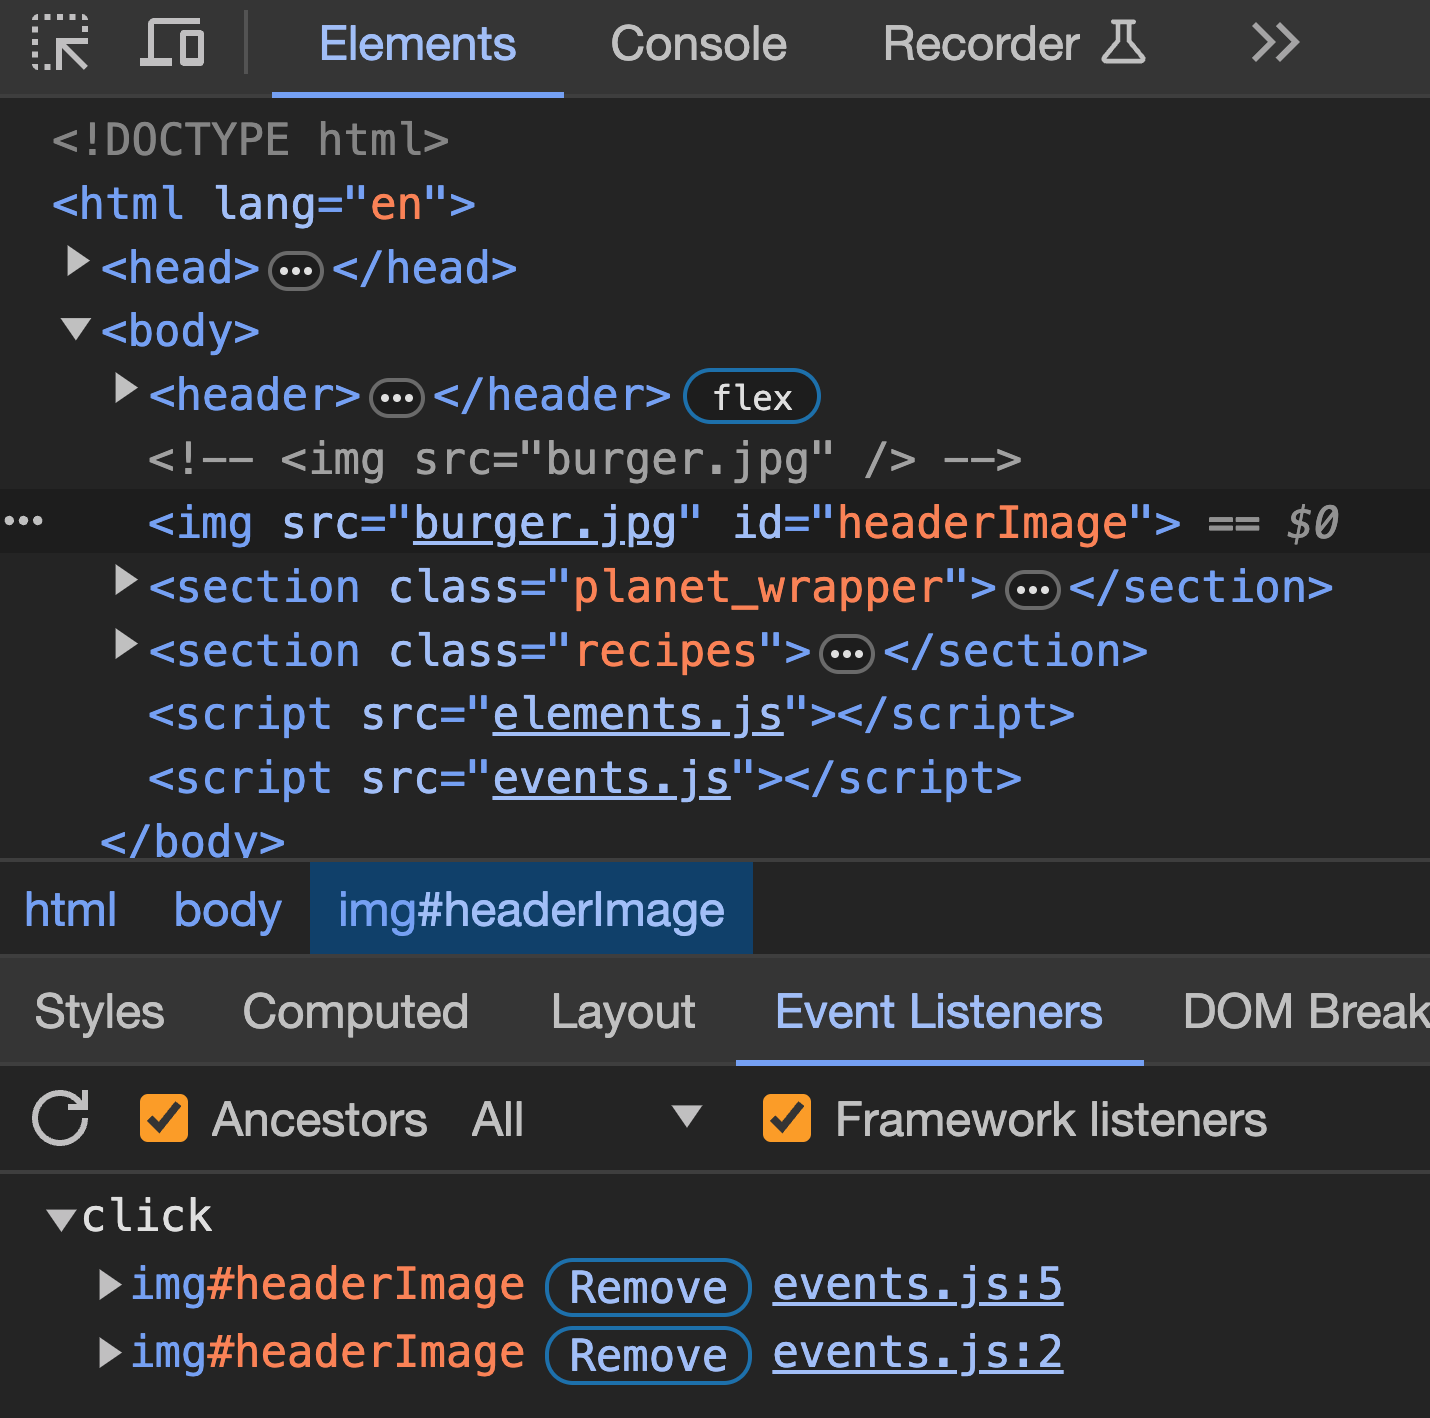
Finding events from the developer tools
If you want to see what events are attached to an element, we can also see from the developer tools.
In the browser, right click > inspect to open the developer tools.
Select an element, such as our image element, then look for the Event Listeners tab which shows we have a click event attached to the image:
Recap
We have covered three ways to attach an event listener to an element:
- We added an inline HTML attribute, although this is probably something you should avoid to keep your HTML clean. 2.We then called the event listener directly on an element, and this kept all our JavaScript code together. One of the limitations was we could only run one function or one piece of code from this example.
- Then finally we looked at the
addEventListenermethod which not only solved this problem, but we will see more features it has available soon.