Event Propagation
Open the project folder
In our starter files, open the index.html page from this lessons folder:
04.Events-And-The-DOM > 11.Event-propagation
Starter code
Next, we will look at something important that happens behind the scenes when dealing with events. And to see this better, we can add another event to the starter project. The starter project is where we left off previously.
Looking at the recipe section in the browser, we may want to click on the full recipe section (article). A use for this could be to make it bigger when selected, or to be taken to the full recipe page.
Let’s simulate this in our events.js file:
// 3. create function
function redirect(e) {
  alert('recipe clicked');
};
// 1. select articles
const recipeTitles = document.querySelectorAll("article");
// 2. Loop over each and add an event listener
recipeTitles.forEach(function(title) {
  title.addEventListener('click', redirect);
});
This should now alert when the article section is clicked. But what about the star which is also listening out for a click?
Click on the star and we get the name of the recipe as expected, and then the redirect function is called after. You may not be expecting this because we have clicked on the star and not the article. The reason for this is because of various phases which occur during the event.
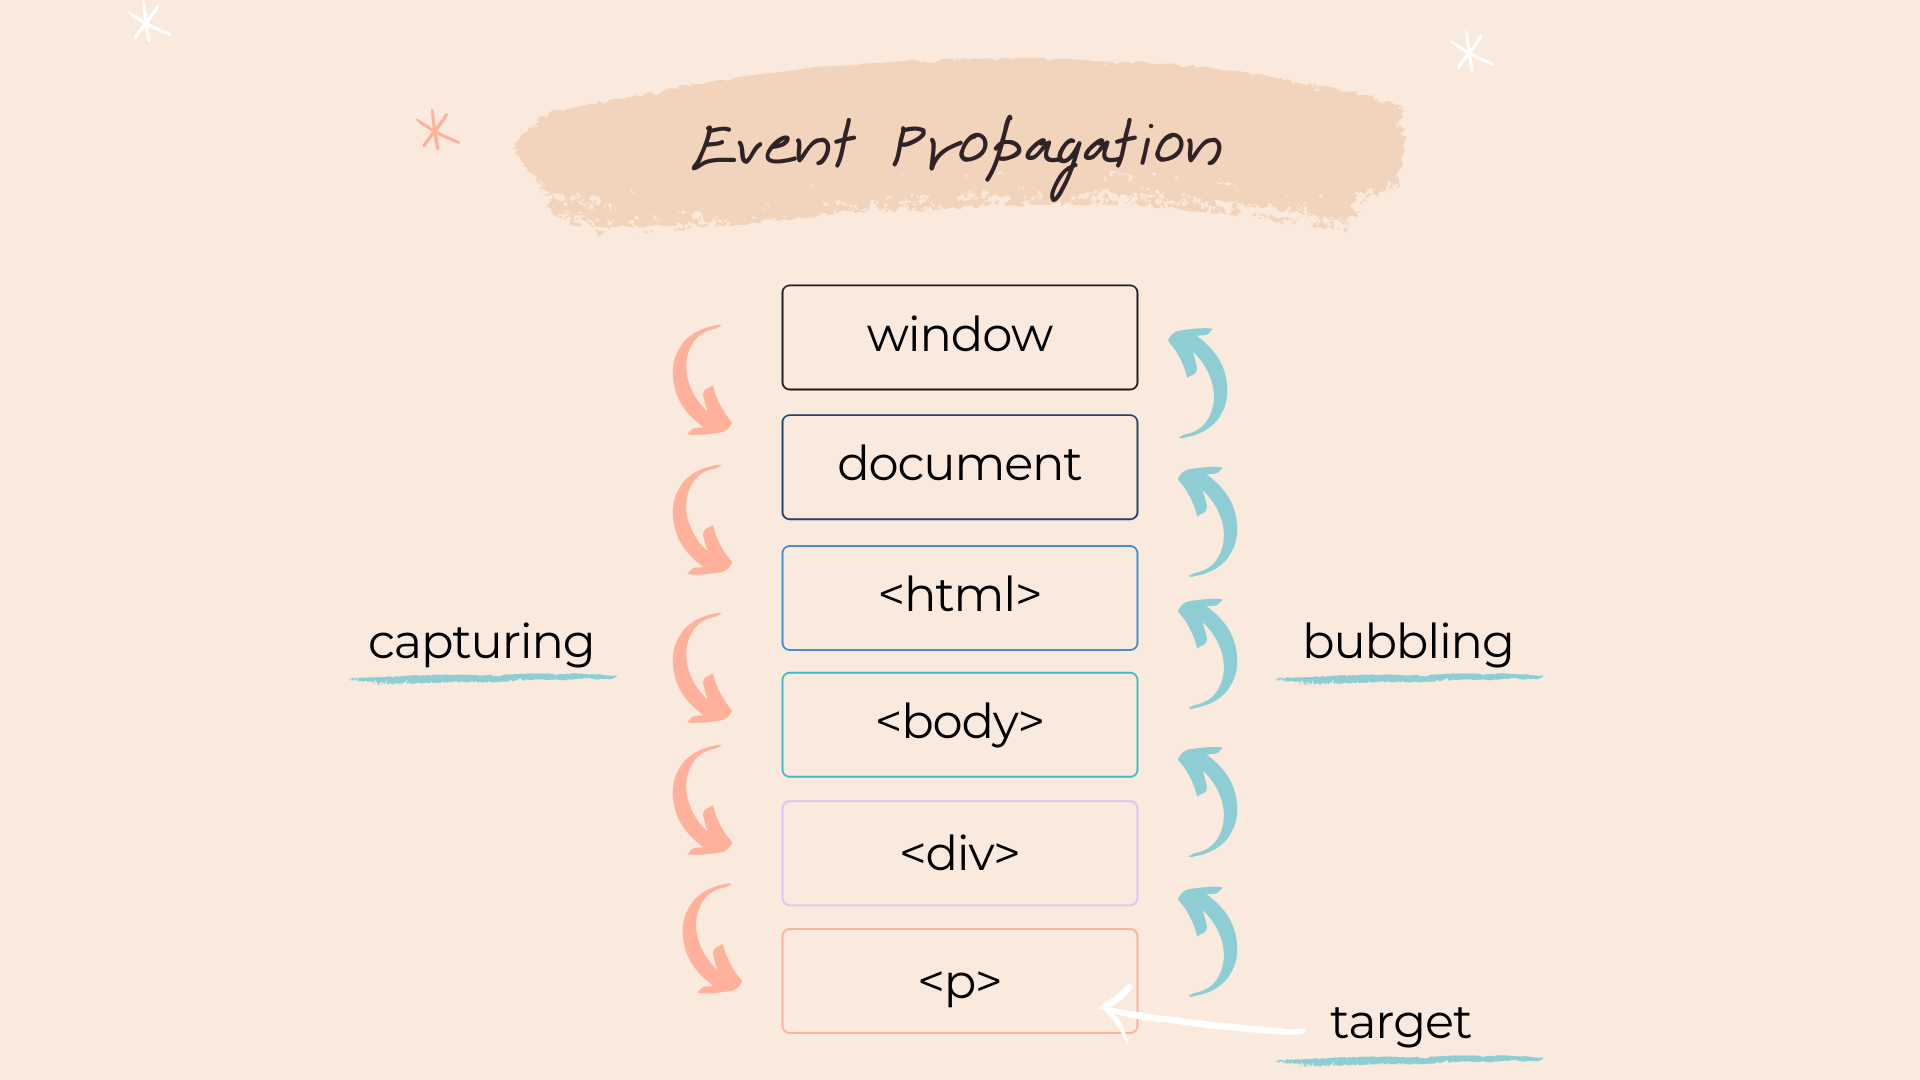
Event bubbling
In modern browsers event handlers will do something called bubbling by default. If you think of a bubble in water, it will float to the top. And this is what happens with our events.
We can see this better if we go into our HTML and find any article:
<div class="recipes_container">
<article>
<span class="add">☆</span>
<img src="burger.jpg" alt="" />
<h4 >Ultimate Vegan</h4>
<div class="recipe_info">
<span>2 people</span> ~ <span>30 mins</span> ~
<span>457 calories</span>
</div>
</article>
When we trigger an event such as clicking on an element the bubbling phase will cause it to not only set off this click event, but also trigger any other events inside of other parent elements.
Therefore, when we click on the star, it also bubbles up to the parent article element, firing this event handler too. It then carries on up to the div wrapper, the <section class="recipes">, the body, the html, the document, and finally the window object.
If there are any more on the way, it will run these too. This bubbling can be useful, for example rather than add an event listener to lots of child elements, we could just add one to a parent element.
We can test this by adding a simple event to the body:
<body onclick="alert('body')">
Give this a try by clicking on the web page and it will alert, then remove this example.
Event capturing
There is also the opposite available and this is the capturing phase. This begins at the top which is the window object and runs all the way down to the element which fired the event. This element which fired the event is called the target.
Knowing that other nested events are also triggered on the way up or on the way down, leaves us with some different ways for how we want to handle it.
We may still want all the events to fire, but maybe do the opposite of what we currently have. Currently if we click on the star it will run the inner function, then bubble to the outer (article) function.
But we may want them to fire in the reverse order. Or we maybe don’t want other events to be called at all, we might just want the one we clicked on. to run And there is a way to do both.
Enabling capturing
First, to reverse the order of the events to make use of the capturing phase, we can enable this in the addEventListener() method by adding true:
const recipeTitles = document.querySelectorAll("article ");
recipeTitles.forEach(function(title) {
  title.addEventListener('click', redirect, true)
})
Or this can also be added as an options object:
title.addEventListener('click', redirect, {capture: true})
Both ways work just the same. This now switches to run this event on the capture phase. Back to the article in the HTML:
<div class="recipes_container">
<article>
<span class="add">☆</span>
<img src="burger.jpg" alt="" />
<h4 >Ultimate Vegan</h4>
<div class="recipe_info">
<span>2 people</span> ~ <span>30 mins</span> ~
<span>457 calories</span>
</div>
</article>
Since capture will start at the top, it will now reach the article first, and the h4 event second. So, this switches around the order the events will be called. The overall term for this bubbling and capturing is event propagation.
Stop propagation
And we can also stop this propagation completely. This would mean only the exact event we trigger will run, rather than any others in the tree.
As an example, to only run the addToFavorites function when we click on the star, we can access a method on the event called stopPropagation:
function addToFavourites(e) {
  e.stopPropagation();
  alert(`${e.target.parentNode.children[2].innerText}`)
}
Remove the capture option from below:
const recipeTitles = document.querySelectorAll("article ");
recipeTitles.forEach(function(title) {
  title.addEventListener('click', redirect)
})
This will then only show the title alert when we click on the star. The reason why we have both the capture and bubbling stages is historic. A long time ago when browsers were less standardised, some browsers used capturing and some used bubbling, which lead to the current standard where both is now implemented.