The Vue Lifecycle

A little HTML, CSS, & JavaScript knowledge if recommended for this course.
To follow along, the starter folder is located in The Vue instance lesson.
Introduction to the Vue.js lifecycle
When we create our Vue app or Vue instance, there are a series of stages going on behind the scenes. Such as when an instance is created, updated, or mounted to the DOM.
At various stages we have the chance to call a function to run custom code. Examples of custom code could be to fetch data from a database once the app mounts, or, remove event listeners when a component is unmounted/removed.
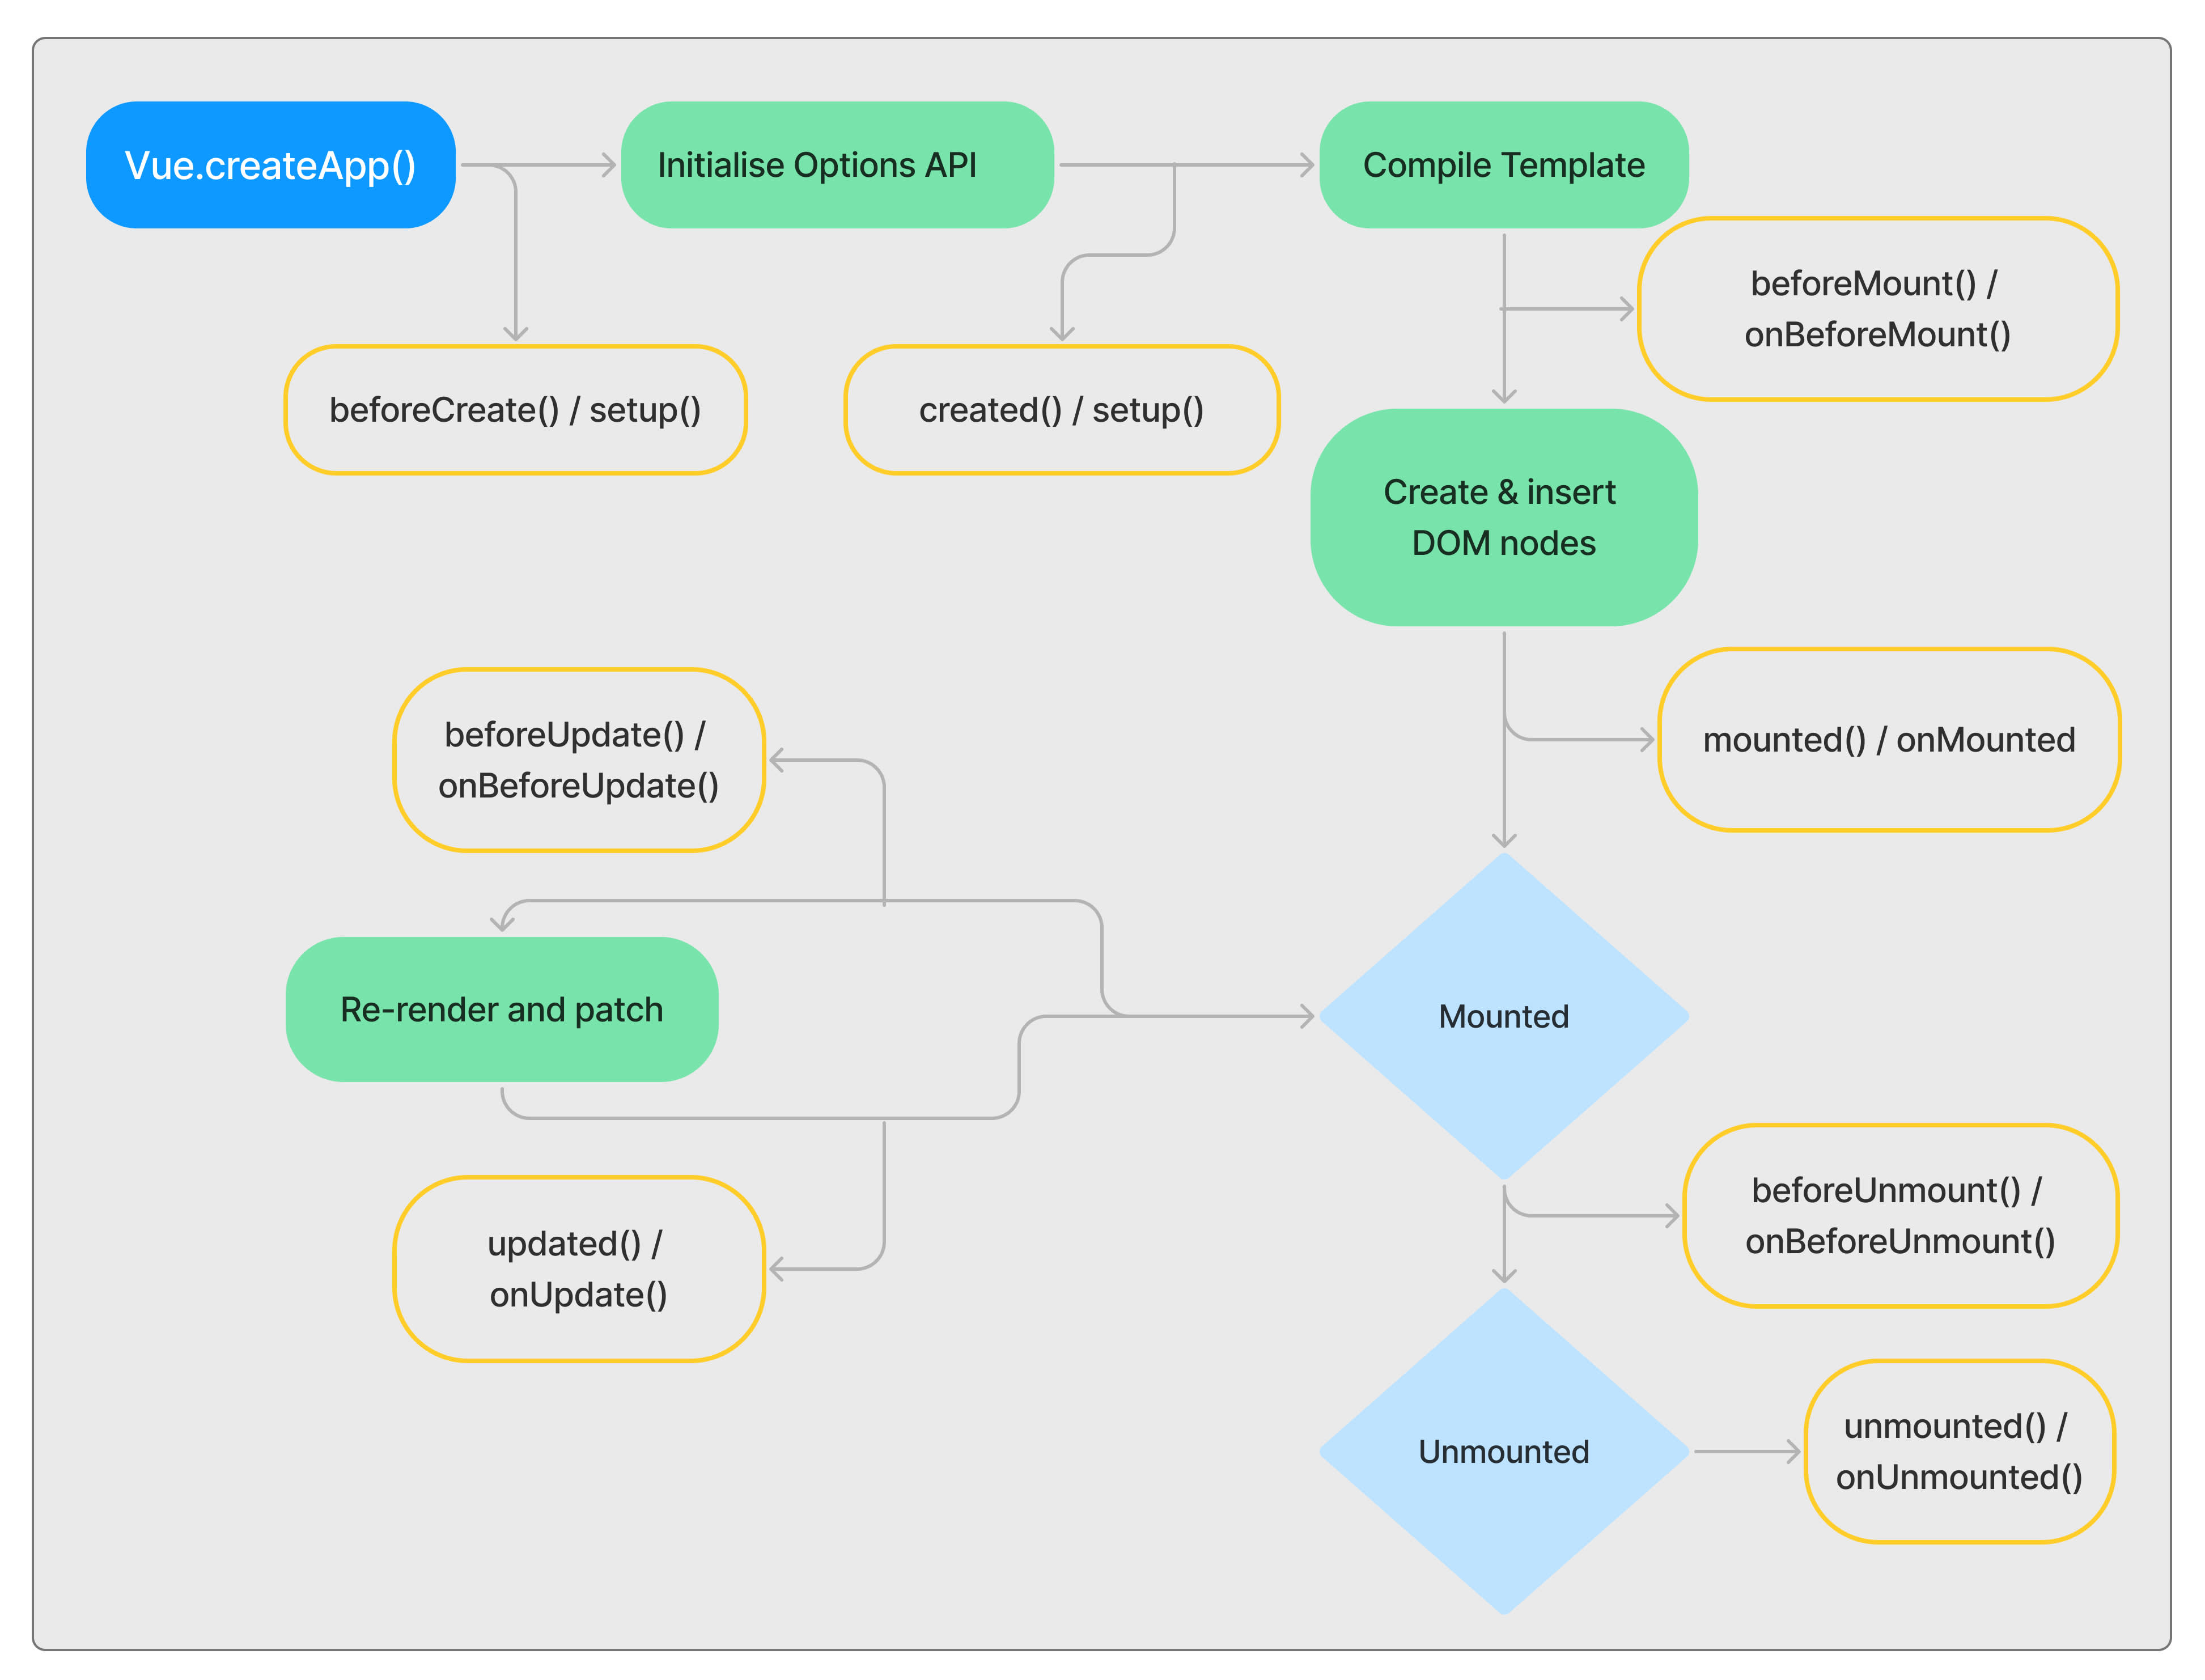
At the beginning there is Vue.createApp(). We have already used this and then mounted it to a element. The lifecycle stages continue until the final unmounted stage. You will see examples of lifecycle hooks (functions) we can use in yellow.
Each stage has two examples such as mounted() / onMounted(). These are comparable hooks for when using the Options API (first) and the Composition API (second).
We are currently using the Options API but will cover the Composition API later in this course.
Using lifecycle hooks with the Options API
As the instance is being created we have access to the beforeCreate and created lifecycle hooks. Each one of these hooks can be added to the object inside createApp(), alongside the data and methods sections:
Vue.createApp({
  beforeCreate() {
    console.log("beforeCreate:" + this.name);
  },
  created() {
    console.log("Created:" + this.name);
  },
  data() {
  // ...
We use the this keyword to access other values such as data poperties and methods. Due to this pointing to the current Vue instance, we must avoid using arrow functions for lifecycle hooks.
Open the console and you will see the results:
beforeCreate:undefined
Created:Homer Simpson
You will only see the name property for the created() hook. Why is this?
This happens because it's not until the created stage where Vue has finished processing and setting up the options object such as data and methods. Meaning we would only use this for something such as an API call which was not linked to our data.
Vue.js lifecycle example
To see how this works in practice we will use a simple API call to request sample blog posts. We will use the {JSON} Placeholder website for sample data.
This is a very simple and free to use API that we can use to get data such as blog posts. We add /posts on to end of the URL to get sample blog posts:
https://jsonplaceholder.typicode.com/posts
Adding /posts will return the data in JSON format. Create a new method to call this data:
// script.js

methods: {
  async getPosts() {
    let response = await fetch("https://jsonplaceholder.typicode.com/posts");
    let data = await response.json();
    console.log(data);
  },
  // ...
},
Leaving a list of blog posts stored in this data variable. There are now two things to do:
- Call the
getPostsmethod to fetch the data. - Set the
postsdata property equal to the data we fetch.
Calling the getPosts method when a button is clicked would not be ideal, we need this to be called automatically. Sounds like a good use case for a lifecycle hook. We can not use the beforeCreate hook, remember this is called before the app is created so the getPosts method will be undefined.
Fetching data using the created() function
We could use mounted() once the app has mounted to the DOM, or, even earlier we could use created():
Vue.createApp({
  // 1. Remove beforeCreate
    // beforeCreate() {
    //  console.log("beforeCreate:" + this.name);
    // },
    created() {
    // 2. Call getPosts method inside of created
        this.getPosts();
    },
The console will now display an array of post objects:
(100) [{…}, {…}, {…}, {…}, {…}, {…}, {…}, {…}, {…}, {…}, {…}, {…}, {…}, {…}, {…}, {…}, {…}, {…}, {…}, {…}, {…}, {…}, {…}, {…}, {…}, {…}, {…}, {…}, {…}, {…}, {…}, {…}, {…}, {…}, {…}, {…}, {…}, {…}, {…}, {…}, {…}, {…}, {…}, {…}, {…}, {…}, {…}, {…}, {…}, {…}, {…}, {…}, {…}, {…}, {…}, {…}, {…}, {…}, {…}, {…}, {…}, {…}, {…}, {…}, {…}, {…}, {…}, {…}, {…}, {…}, {…}, {…}, {…}, {…}, {…}, {…}, {…}, {…}, {…}, {…}, {…}, {…}, {…}, {…}, {…}, {…}, {…}, {…}, {…}, {…}, {…}, {…}, {…}, {…}, {…}, {…}, {…}, {…}, {…}, {…}]
Each object is a blog post containing the body, id, title, and userId:
body: "quia et suscipit\nsuscipit recusandae consequuntur expedita et cum\nreprehenderit molestiae ut ut quas totam\nnostrum rerum est autem sunt rem eveniet architecto"
id: 1
title: "sunt aut facere repellat provident occaecati excepturi optio reprehenderit"
userId: 1
This is a similar structure to our current posts array:
const posts = [
    {
        id: 1,
        title: "Why I learned Vue",
        body: "I'm baby chambray street art <strong>thundercats</strong> occupy four loko church-key disrupt. Shaman neutra bushwick chicharrones",
    },
  // ...
This data can replace the three posts we already have, first, unlink the posts data property from the posts array, by setting this to be an empty array:
data() {
  return {
    name: "Homer Simpson",
    links,
    posts: [], // set to an empty array
Then update these posts with the data from the API call:
async getPosts() {
  const response = await fetch(
    "https://jsonplaceholder.typicode.com/posts"
  );
  const data = await response.json();
  // console.log(data);
  this.posts = data; // set data property
},
Refresh the browser and you should now see all of the new blog posts displayed!
The reason this works is because the data from the API is structured similar to our original blog posts:
<!-- index.html -->

<article v-for="(post, index) in posts" :key="post.id">
  <h3>{{post.title}}</h3>
  <p v-html="post.body"></p>
  <p class="read_more">Read More</p>
</article>
It has the id, the title, and the body properties. If using different property names, we could update it here to see the data.